
The blob brush tool is one of my favorite tools in Adobe Illustrator, but it can be really frustrating if you don’t know how to use it. When you master the blob brush tool, you can use the tool in a multitude of ways to streamline the designing process. To help you learn the ins and outs of using the blob brush tool, here is a list of my top 5 tips for using the blob brush tool.
Let’s get started!
Tip 1: Keep Selected vs Merge Only with Selection
By default, the blob brush tool will always start out with the keep selected setting checked. This means that every time you draw over a blob brush line with a new line of the same color those lines will merge together creating one shape like the cross below.

This is a great feature if you need to color something in because instead of creating a bundle of paths like you would with the paintbrush tool, you are creating a shape. Sometimes, however, you might need to create layers and you don’t want the blob brush tool to automatically merge two touching shapes of the same color together. To stop your paths from merging you can do 2 things. The first thing you can do is make sure to change the color every time you need your shapes to stay separate. The second thing you can do is double-click on the blob brush tool. This should open up a blob brush tool options box and at the top of the box select merge only with selection. Now you can still use the blob brush tool to merge shapes together, but they will only merge when you have your shape selected and your new drawing is touching the shape.
Tip 2: Filling in Your Shapes
You don’t actually need to color in your shapes with the blob brush tool. Instead, you can select and delete paths to color in your shapes. For instance, take this flower:
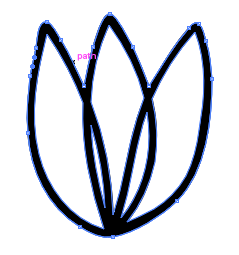
If you select and delete the outside path, Illustrator will fill in only the inside of the flower leaving out the original outline like so:
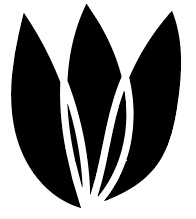
If you want to keep the original outline you can select each individual inside path and delete them one by one. 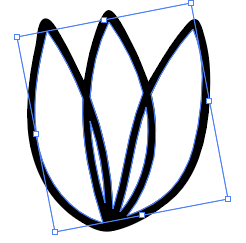
This allows you to fill in the entire shape of your flower or individual sections of your flower without having to manually color in your shape.

Tip 3: Creating Corners
The one thing the blob brush tool is not good at is switching between rounded and sharp corners. The blob brushes default is to create rounded corners because the brush is naturally round. You can change the roundness of the brush in the blob brush settings by double-clicking on the blob brush and adjusting the roundness, but that also affects the size and shape of your brush. Instead, create individual shapes like so:

Typically the shapes would be the same color, but for the purpose of this tutorial, I wanted you to see that there are two shapes. Select both shapes and in the left-side toolbar select the shape builder tool. The shape builder tool looks like this:

To create a sharp corner we are going to use the shape builder tool to delete parts of our shapes. Hold down alt to make the shape builder tool delete parts of the shape and click on/delete the whole upper section highlighted in green here:

The end product is a sharply pointed corner that you can use to create anything from a bee’s bottom to the top of a paintbrush.

Tip 4: Varying the Lines with a Tablet

The next tip can only be performed with a tablet that has pressure sensitive capabilities, but if you want to make your lines more dynamic, Illustrator has a setting that allows you to change the thickness of your lines based on how hard you press down on your tablet. To change your blob brush tool to pressure sensitive, double-click on your blob brush tool to open up your blob brush options box.
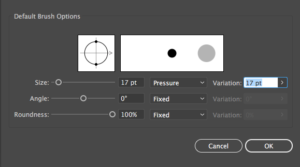
Scroll down to size and change the size from fixed to pressure. Then change the variation to 17 and press ok.
Tip 5: Change the Fidelity to Smooth
I mentioned this in my previous post about using Illustrator without a tablet, but for those of you who don’t have a tablet, it can be hard to create straight lines with the blob brush tool. Luckily, you can change the fidelity of your blob brush tool in your blob brush settings to make your lines smoother.
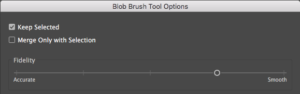
Double click on your blob brush tool and change your fidelity to match the fidelity in the picture.
That’s it. These are a few of my favorite blob brush tips and tricks. Leave a comment down below with some of your favorite blob brush tricks.
If you liked this post, why not share it! It lets me know what posts you like so I can make more posts like this.


Deepak Kumar
thanks for sharing this tips
Kelcie Makes Patterns
You’re welcome!
Kelly
Very helpful and easy to understand,, thanks!
Kelcie Makes Patterns
You’re welcome!
Lili Hernandez
Help! I´m trying to change the Fixed to Pressure on the Default Brush Options menu, but the Fixed and Random are the only ones showing up even though I´m using a Wacom tablet.
Kelcie Makes Patterns
Hey Lili, can you take a screen shot of the Default Brush Options menu with fixed and random showing and send it to me so I can get a better sense of what is going on?
Zach
Did you figure this one out? I am having the same problem…
Pressure option is greyed out in the blob brush menu.
Kelcie Makes Patterns
Hey Zach, what kind of tool are you using to draw? If you are just using a mouse or a laptops trackpad pressure wouldn’t work with the blob brush tool because pressure only works with a pressure sensitive pen in Adobe Illustrator. For example, if you had a Wacom tablet with a pressure sensitive pen that would work, however, if you don’t have a tablet that uses a pressure sensitive pen you will see pressure grayed out on Adobe Illustrator. I hope this helps.
Zach
Wacom Intuous Pro…. Maybe it thinks it’s a mouse??? Not sure… Stumped!
Kelcie Makes Patterns
I have never had this problem before so I had to look a few things up. Apparently this is a common problem, but one thing that has worked for other people is making sure you have installed all of the drivers for your specific tablet. You can find which drivers you need to install here: https://www.wacom.com/en-us/support/product-support/drivers . Also, some people have said that sometimes illustrator doesn’t recognize the tablet if you plug it in before you start up illustrator so maybe if you load illustrator first and then plug your tablet in that would help also. Hopefully this will work, but if you’re still having trouble with this your best bet would be to contact Wacom directly.
Sacha
Great tips thanks Kelcie!
I am using my laptops trackpad and i’m more used to using the pencil tool because I often need to edit my lines a lot.
Is there a way to edit the blob brush lines together as if they are one line and not a shape? I can see the great advantages of using the blob brush from your tips, but this is the problem I have that puts me off from using it. I hope you can help!
Kelcie Makes Patterns
If you double click on your blob brush tool at the very top you will see an option that says merge only with selection. If you turn that setting on that is the closest thing you will get to making lines with the blob brush tool because you will no longer be able to merge your lines together unless you have the line selected. It still creates a shape, however, the shape looks and acts more like a line. Your best bet for creating lines is using the pen, pencil, or paintbrush tool.
Kelcie Makes Patterns
Thanks for the feedback. While I am not sure what you were trying to accomplish with this comment, it honestly made me laugh. Thanks for ending my day on a high.