
I’ve seen a lot of cool artwork lately where the artist makes it look like something is weaving in and out of an object. It gives a lot of dimension to the drawing with minimal effort so I thought I would show you how you can achieve that look in Adobe Illustrator.
Let’s get started!
We are going to start out with a simple drawing of 2 interlocking circles.
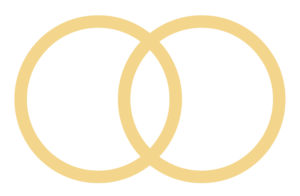
I created these circles by drawing two circles using Illustrator’s shape tool and increasing their strokes to 40. With the circles selected, you can then go to object, expand and turn those strokes into shapes.
Once you have created the circles and arranged them like in the picture above, select both circles and in the pathfinder panel click the divide tool.
I should mention before we continue that in this tutorial I am not going to go into detail about where you can find things in Illustrator. If you ever can’t find anything I mentioned you can go to windows and scroll to one of the panels I mentioned or type in a tool I mentioned in the help search bar at the top of Illustrator.
The next part of the tutorial is to find all of the intersecting parts that were cut into their own shape when you divided the circles.
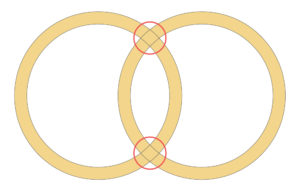
To help you understand what I am talking about I have circled the two intersecting paths, as well as, added a stroke to the circles. The finishing product should not have strokes.
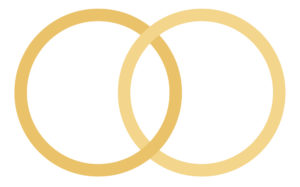
At this point, you want to change the color of one of the circles. That new color should also be applied to one of the intersecting shapes. The other intersecting shape should stay the same as the original color. You end up with two circles that look like they are linked together like this:
Now that you have the basics of this tutorial, let’s try something a little bit harder.

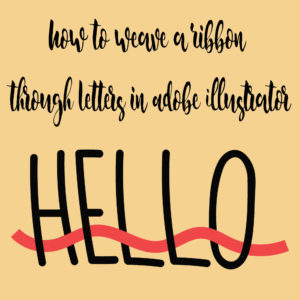
I created this simple hello using the blob brush tool and wanted to weave a ribbon through it. We are going to start by selecting both hello and the ribbon. We will do the same thing we did with the two circles by going to the pathfinder panel and dividing hello and the ribbon. Find all of the intersecting shapes that were just cut out with the divide tool.
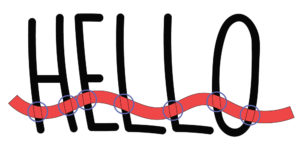
In the picture above I have highlighted 7 intersecting shapes. Take every other intersecting shape and change its colors to match the colors of the object you want to weave your shape in and out of. In this case, I want the ribbon to weave in and out of the hello so every other intersecting shape should be black. The end product should look something like this:

Now that you know how to create this effect in Illustrator, the possibilities are endless to what you can do with this tutorial. If you do use this tutorial I would love to see it. You can either post your artwork in the comments down below or post it on Instagram and tag me.
If you liked this post, why not share it! It lets me know what posts you like so I can make more posts like this.


Alexis C.
This is awesome! I’m definitely going to try this out!
Kelcie Makes Patterns
I am glad you liked it.