 Adding color to your artwork is one of the hardest things to master in Adobe Illustrator because you tend to want to think of colors realistically. For instance, if you are creating a carrot you want to make it orange, however, mastering color in Illustrator involves throwing away the notion that everything has to be naturalistic and creating something that is unique to your style. In this post, I want to explain different Illustrator tools and functions that will help you pick the right colors for your artwork to help you develop your own style through color. I am going to start from the very basic of Illustrator tools so bare with me.
Let’s get started!
Adding Fill and Stroke
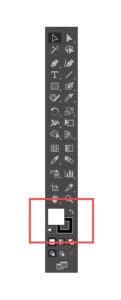
When you open Illustrator you will always see this toolbar on the left. For coloring your artwork, what you want to focus on is the two icons that are highlighted in the red square. The white box is your fill box, the box that is responsible for filling in an element in your artwork. The box behind the white box that has a black border is your stroke box, the box that creates a border around the elements in your pattern. To change the color of an element in your artwork, make sure that element is selected and then double-click on either one of the boxes depending if you want to add color to the stroke or the fill. A popup will appear that looks like this:
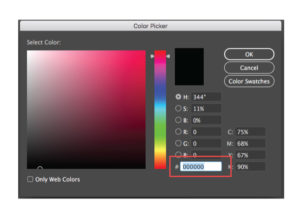
You can then pick the color you want and press ok to apply the color. It is important to note that every color has its own identifying number. You can find that number in the box I highlighted in the picture above. When you are working on a commissioned piece for a company they will sometimes require that you work in a specific color pallet. If that is the case, you will likely get numbers for specific colors which you can then add one at a time to the box I highlighted.
Swatches Panel
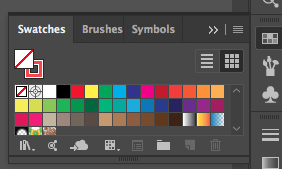
The swatches panel is another important tool for adding color to your patterns. Each time you open an Illustrator document it will open up with the same preset of colors and patterns. With an element of your artwork selected, you can pick one of the colors and easily add it to your artwork. In the top right corner of the swatches panel there are four lines highlighted here:
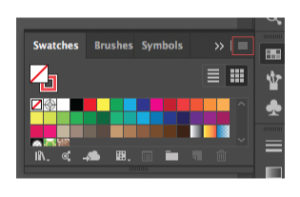
If you click on that and scroll down to swatch library you get an even bigger selection of colors based on certain themes like nature and foods. You can also save a color group of one of your projects to use later. You do this by selecting the colors you want to save and clicking on the folder icon at the bottom of the swatches panel. This will open a popup box which you can then add a name to the new color group and press ok. To save that new color group, again click on the four lines in the upper right corner and scroll down to save swatch library.
Color Guide Panel
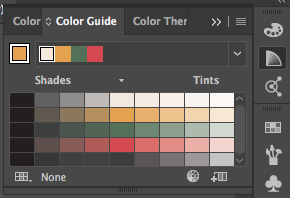
If you ever need to make a color lighter or darker the color guide is where you go. When you click on the color guide icon, Illustrator is preset to show shades and tints. The middle box in a row is the original color you have selected. This is indicated by a triangle pointed downward. When you click on the drop-down menu indicated by the 4 lines in the right corner you can also look at warm and cool versions of a color as well as vivid and muted versions of a color.
Recolor Artwork
![]()
There are many things that you can do with the recolor artwork tool but I want to focus on my favorite feature. Your recolor artwork tool is found in your top toolbar to the left of align. It will only show up if you have a color selected in your artwork. With all of your artwork selected click on the recolor artwork tool. When you do this, a pop-up menu should appear that looks like this:
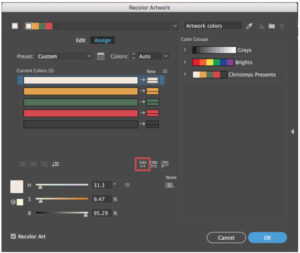
We are only going to focus on the randomly change color order button which I have highlighted in the picture above. When you click on the button, it will rearrange all of the colors you have selected making your artwork look completely different. Since the colors are being rearranged randomly, not all of the new color suggestions are going to look good, but the randomly change color order button will allow you dip your toes into slightly more unconventional color options.
Adobe Color CC
If you are struggling to find colors for your artwork and need some suggestions, Adobe Color CC is a great place to get color ideas. Adobe Color CC is not part of Adobe Illustrator and can be found online here. It allows you to search for color pallets using specific keywords like “vintage”, “pastel”, or even “Ice Cream” to find colors that suit your specific project. I like to use Adobe Color CC to find colors I like and pull those colors from different pallets to create my own color pallet. One thing I would advise against when using Adobe Color is not to only use colors from one specific pallet you found on Adobe Color. Pull colors from multiple different pallets so the color pallet for your artwork is unique.
These are a few Illustrator tools I like to use when I am adding color to my artwork. What are some things you like to do to color your artwork in Adobe Illustrator?
If you liked this post, why not share it! It lets me know what posts you like so I can make more posts like this.


