
One of my favorite tools to use in Adobe Illustrator is the blend tool because it is so versatile. You can use it to make a color lighter or darker, make an object look like it is behind glass, etc. but the thing I have been using the blend tool the most lately is to merge 2 lines that are going in different directions. For instance, you may have seen on my blog a few weeks back that I made this free cupcake pattern for.

In order to create the lines on the cupcake liner, what I would usually do is place each line by hand. This always created an outcome in my designs that I wasn’t quite happy with, but with the blend tool, I am able to quickly and accurately merge two lines to create clean lines that are evenly spaced.
So let’s get started.
Step 1:

So I have this flower base that I want to add evenly spaced lines to. To add the lines, first draw a line with your pen(p) or pencil tool (n).

If you are creating an object like that in the cupcake pattern where the lines are inside the object you wont need to do this, but when you draw the lines in a shape like the flower make sure that the lines are drawn bigger than the flower. We will cleen those up later.
Step 2:
Select the line you just drew and go to object, transform, and reflect.

Make sure the vertical axis is selected and press ok. Select the new line and drag it to the other end of your flower. Your flower should look like this:

Step 3:
Select both lines and go to object, blend, and blend options. A blend options box should appear.
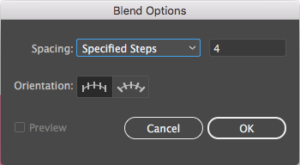
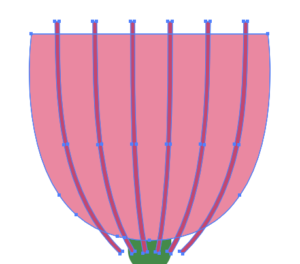
Make sure spacing says specified steps and decide how many steps or in this case lines you want your design to have. I have chosen 4, but each design is different. Press ok and go back to object, blend, and make.

Step 4:
Now each of your lines are grouped together but you can only select the outside lines which we don’t want. To ungroup them, select your lines and go to object and expand. You are going to have to do this twice to change your lines from strokes to vector objects.
Step 5:
Select only the lines and the top of the flower and select your shape builder tool in your leftside toolbar. Your shape builder tool looks something like this:

You want to delete the parts that are hanging off of the pink part of the flower base. To do this hold down alt and drag your shape builder tool across all the bits of the lines that fall outside of the flower base. If you did it correctly your flower should look similar to this:

You are done! In the past I have used this technique on flowers, cupcakes, house roofs, etc., but it can be applied to any design that you want to add more detail to. How do you like to use the blend tool?
If you liked this post, why not share it! It lets me know what posts you like so I can make more posts like this.