How to Make a Simple Snowflake Pattern in Adobe Illustrator
Winter is almost approaching so I thought I would show you how to make a simple festive snowflake pattern. This pattern utilizes Illustrators pattern tool so you don’t have to know a lot of the technical stuff to make this pattern. Before we get started, make sure you only have a stroke color selected and no fill color. To do that, go to your fill box. The fill box looks like this:

Select the square box that doesn’t have a hole in the middle of it. In my case, that square is white. Below your fill and stroke color boxes, you will notice that there are three smaller boxes.

Click the box all the way to the right with the red diagonal line in it and that will get rid of your fill color.
Now that you have gotten rid of your fill color, Let’s get started!
Step 1:
![]()
Draw a vertical line using your pen tool (P).
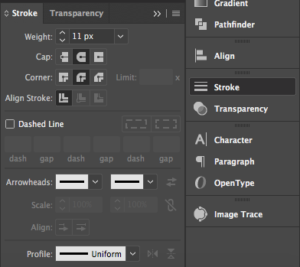
Select the vertical line and go into your stroke panel in your right-side toolbar. If you cannot see your strokes panel, you can find it by going to window in your top toolbar and scrolling down to stroke. In the stroke panel your want to change your cap and corner to round like in the picture above. You also want to change the weight of your stroke to 11.
Step 2:

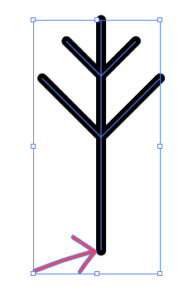
Use your pen tool (P) to draw a v near the top of your vertical line like in the picture above. To make your v symetrical on both sides, hold down shift while drawing the v. This will draw your lines at a 45 degree angle.

Select the v and drag it down a little bit, holding alt at the same time so you duplicate the v. Select the second v, hold down alt and shift, grab the corner of your bounding box, and drag out your v to make it slightly bigger.

Select your design and press control-G to group all of the elements in your design together.
Step 3:
Select your design and press R to activate the rotate tool. To use your rotate tool, click on the anchor point at the very bottom of your design. The picture above indicates where you should be clicking. This should drop a little rotate marker that looks like this:
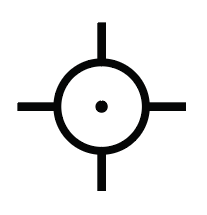
This rotate marker lets Illustrator know where you want to rotate your design around. Hold down alt and click on your rotate marker again.
This should open up a rotate options box. In the angle box put 360/6. This tells Illustrator that you want to rotate your design 6 times around a 360 degree circle. Press copy.

This should create another section of your snowflake. Press control-D 4 times to complete the snowflake.
Step 4:
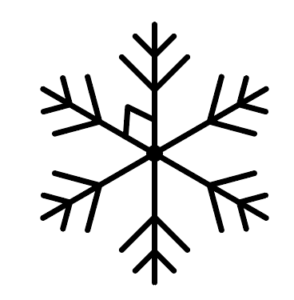
To finish off your snowflake, draw an upside down v in between two of your snowflake parts like in the picture above. Select your upside down v and click the rotate tool (R). Click in the center of the snowflake to drop your rotate marker, Hold down alt and click on your rotate marker to open your options box, and in the angle box put 360/6 to duplicate your upside down v 6 times around your snowflake. Press control-D 4 times to duplicate your upside down v.

Select your whole snowflake and press control-G to group your snowflake together. The last thing you need to do is draw a circle with the ellipse tool (L) in the center of your snowflake. This time make sure your circle has a fill and not a stroke. At this point, you might also want to change the color of your snowflake if you haven’t done so already.
Step 5:
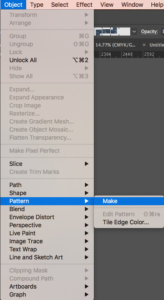
Now your snowflake is ready to make into a pattern. Make sure your snowflake is selected, go to object in your top toolbar, scroll down to pattern, and click on make. Your pattern should look something like this:
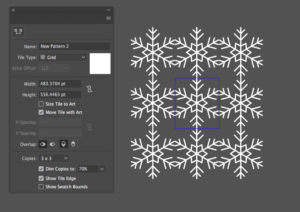
You may have noticed that the pattern is overlapping a little bit. To fix this we want to adjust some of the settings.
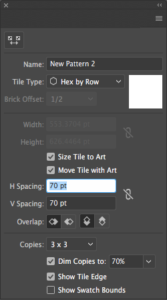
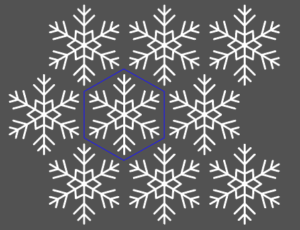
Change the tile type to hex by row. Also, click the size tile to art box and change the H spacing/V spacing both to 70 pt. Your pattern should now look like this:
![]()
Near the top of your artboard there is a strip of commands like in the picture above. Click done to click out of pattern view and your new pattern should be in your swatches panel in your right side toolbar.
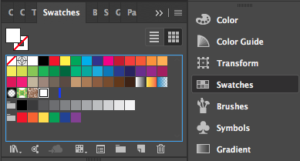
In the picture above, the new pattern has been highlighted. You can find your new pattern at the very end of your swatches first chunk of colors, right above the row of black, grey, and white colors. To use your pattern click on it in the swatches panel and with your rectangle tool selected (M), drag out a square. If you want your pattern to have a background color, click on your pattern and press control-C to copy your pattern and control-B to paste your pattern behind your original pattern. Make sure you do not deselect your new pattern and change that pattern to a color for your backround. After you have done this, you are done.

If you liked this post, why not share it! It lets me know what posts you like so I can make more posts like this.